
Before we get going, the usual disclaimer:
This document is for educational purposes only. Gasifiers make explosive, poisonous, cancer causing gas. Gasifiers can “backfire” explosively when being refueled from air entering the fuel hopper. Be sure to have a pressure relief system. Do not use them indoors. Do not inhale the gasses. Don’t be stupid. Gasifiers run VERY hot. Do not touch any surface with bare skin while in operation or for four days afterward. Do not operate on a combustible surface. Do not dispose of ashes in combustible grass. Don’t be stupid. Do not pipe the gasses indoors. It can kill you and your entire family. Don’t be stupid!
OK. Now that that is out of the way…..Building a gasifier is really a very simple thing. You make a fire in a closed container, blow the flames through the charcoal so the carbon dioxide is chemically reduced into carbon monoxide, and you have a gasifier. How hard could that be? The simple answer is not very. If you want something that runs uniformly all the time, that is MUCH harder.
Let’s start with the simplest example possible, a camp fire. What is it? A camp fire is a stack of wood that is so hot that the wood is thermally decomposing, giving off gasses that burn, and creating flames. If these gasses were to be captured and cooled there would be a range of organic compounds. Some of these would be very similar to the creosote found in chimneys attached to wood burning stoves. When designing a gasifier our job is to combust all these tars until there is nothing left but hot carbon dioxide and charcoal. That means we want to force everything into as small a volume as possible and apply enough air to burn all the tars completely.
OK. Lets make some geometry that forces everything to a small volume, a cone. We also want to limit the available oxygen so we don’t burn up all the gas we are creating so let’s add a lid.
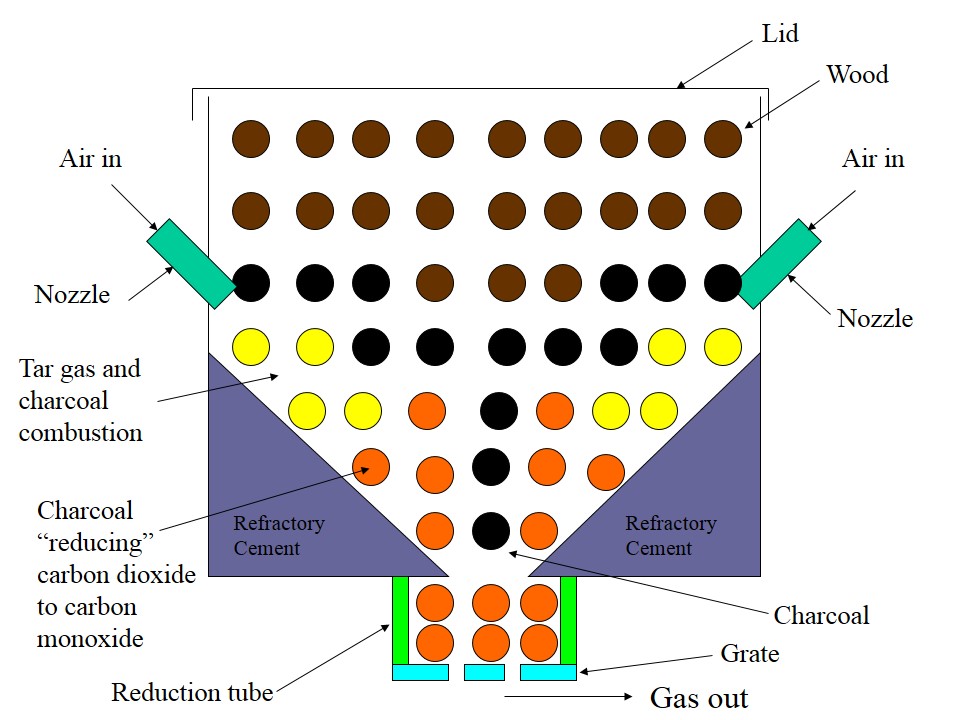
(Click on the image to enlarge)
In the picture above the brown dots are the raw wood, the black dots are the pyrolysis zone where the wood is giving off tar gas and turning to charcoal, the yellow dots are the combustion zone, and the orange dots are the reduction zone where the hot carbon dioxide is turned into carbon monoxide. It also shows the first thing that can go wrong and must be fixed. The black column of dots in the center is an oxygen free path to the restriction through which tar can escape without being burned. Let’s add some air there to ensure combustion.
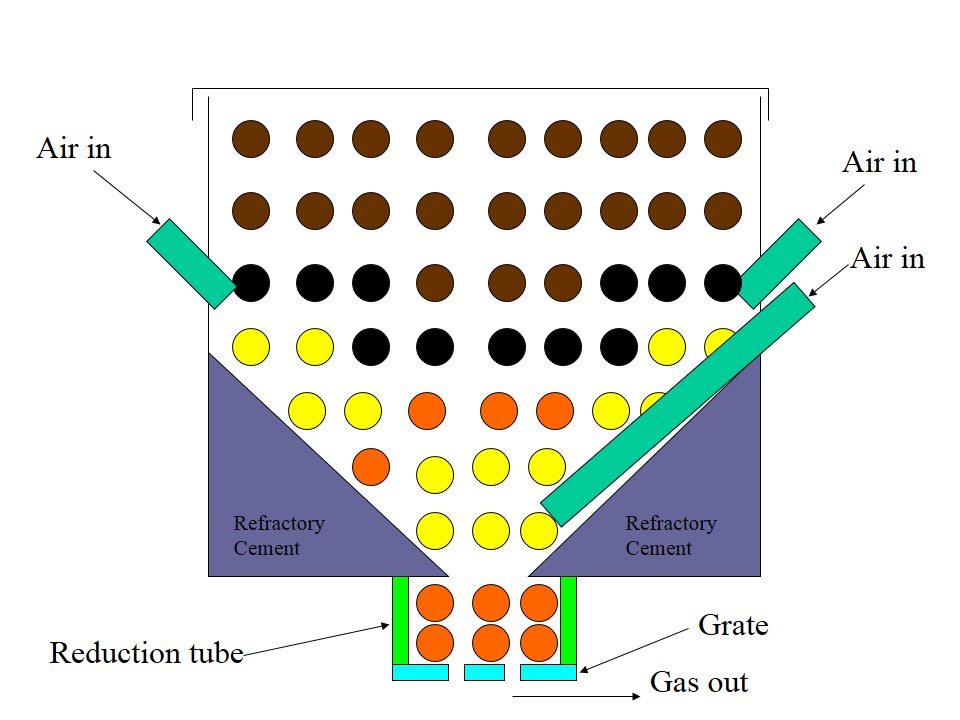
(Click to enlarge and clarify)
Now we have a an oxidization zone at the restriction regardless of the suction applied to the gasifier. With this arrangement nothing above the restriction matters. Tar gas can be behind the nozzles, between the nozzles, …none of it matters because there is combustion air in the one place that all the tars have to go to get out of the machine.
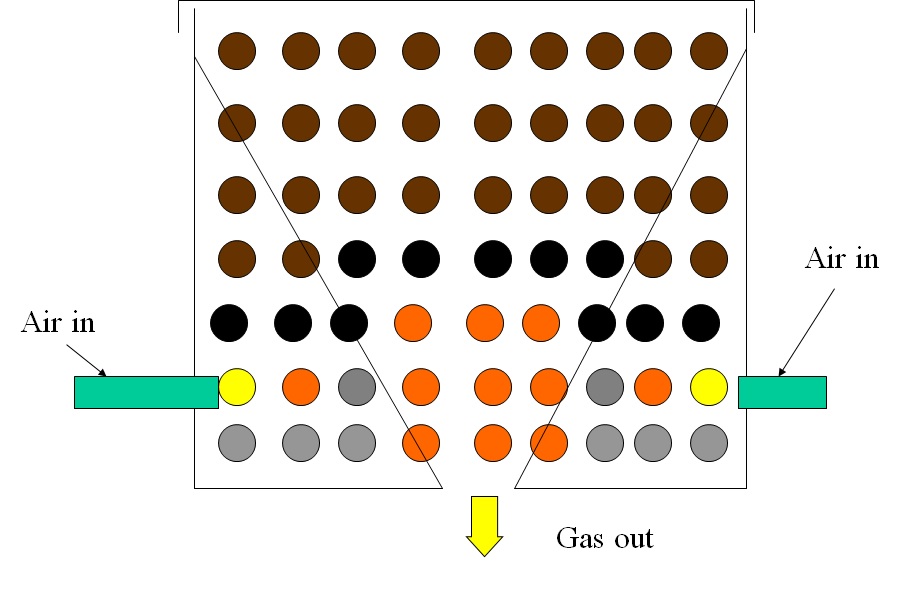
For some people the ceramic cone can be difficult to make. You can also use the simpler “hot well” arrangement to get very nearly the same effect.

(Click to enlarge and clarify)
The hot well keeps the second stage oxygen from dispersing and burning up char instead of tar gas moving toward the restriction. If you have studied other gasifier designs you will notice that most people use horizontal nozzles instead of the down angled nozzles I have shown. I angle my nozzles because it tends to burn out an unsupported “icicle” of fuel that is not contacting the wall. This prevents bridging or fuel flow hang ups. It also forms the pyrolysis zone into an inverted arch so that any tar gas that tries to solidify and glue the fuel together is torn apart because the arch is in tension.
That is about it. There are just a few more “rules” that should be followed, namely:
1.) Minimize the volume of the pyrolysis zone.
2.) Keep your fuel cool and your air hot.
3.) Char tumbles down a 60 degree incline. Be sure that the nozzle tips are inside the 60 degree moving char “cone” so that the ash moves away easily and doesn’t build up. If your nozzle ring is too big, the ash will build up in front of the nozzle, not blow away and melt in place. Don’t do this:
Here is the result:

4.) Keep everything insulated to keep the heat in.
5.) Don’t run steel parts over 500F in an oxygen environment or they will suffer hot corrosion.
6.) Heat your incoming combustion air with the thermal energy in the outgoing gas. This helps with fuel efficiency and improves the gas quality if there is more moisture in the fuel than we would like.
7.) Gasifiers generally like to run between 4 and 12 inches of water column suction. Typical squirrel cage fans only make 1″ of water suction. Look at an eductor or jet ejector pump as a suction source.
8.) Expect your engine to put out 50%-70% of its gasoline rated power.

If there are any further updates or any future updates please keep me informed.I’m going to be starting a project with a 1992 Jeep Cherokee I’m hoping to compact this design.
Scott. Will do. There is nothing new at this time(8/25/2014).
Nice explaination of gasification and your unit.Seems too be working good ,good luck with your work..Thanks